Introduction
In this guide, we will cover how to test APIs or the Back-End side from a QA perspective. We believe that API testing is a crucial part of the SDLC, and it should not be forgotten.
This type of testing can be one of the most challenging parts of testing because APIs can be complicated. They are often based on protocols and standards that we do not always encounter in other kinds of testing.
What Is an API?
API stands for Application Programming Interface. It is an interface, a method, or a way, for two pieces of software to communicate.
Basically, that’s how the “Ends” talk – Front-end to back-end and vice-versa.
Why Is It Important to Test APIs?
Testing the back-end will cover most of the bugs that will be exposed in the Front End. However, just like any other component or system, it still needs to be tested.
There’s also a chance that the back-end functionality will be done faster than the UI side. In this case, waiting for the front-end to be ready is unproductive and could be covered by fixing bugs.
A public API that is exposed to the end-users can break or be broken and it puts the entire process built around it at risk.
Additionally, we still need to test the back-end to add extra security and validations, so the database will not be overloaded with big chunks of data.
Which Tools to Use?
For this purpose, Postman is the right choice for us: a great, user-friendly, and highly capable platform. And you know from another one of our articles that we love Postman!
The Anatomy of an Endpoint
Firstly, let’s understand the anatomy of an endpoint. Generally, it looks something like this: https://{host}/{endpoint}. Simple, right?
Here’s an example: https://your.website.net/api/user/ which can be further explained as follows:
https:// – this is the protocol, and it stands for Hypertext Transfer Protocol Secure (https);
your.website.net/ – this is the URL, the back-end link;
api/user/ – this is the endpoint, where all the magic happens.
Additional Options:
/{ID}/ – this is an ID. Usually, a created object should have a way to identify it. This is where the ID comes in handy to point what object you want to change.
/{params} – the path parameters added in an endpoint will influence the response. It can be used in filters, for example.
Methods
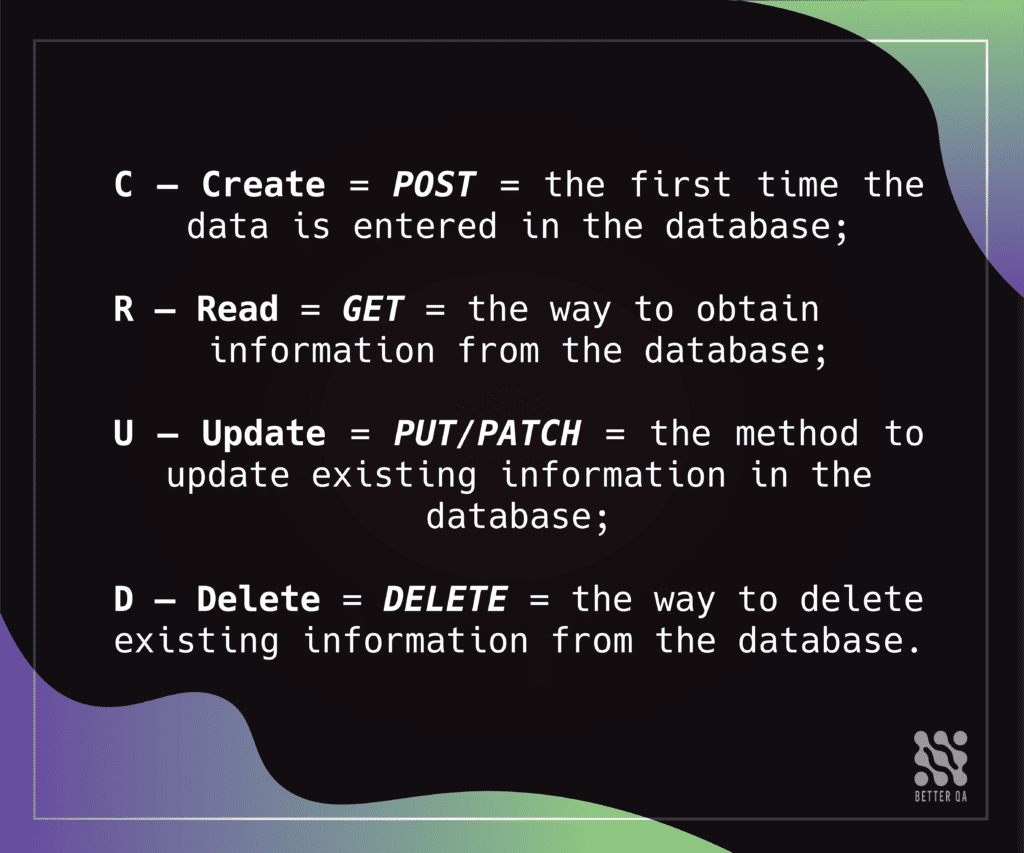
Besides the endpoint, we’ll need a Method. Most back-ends use the CRUD operations, which stand for Create, Read, Update, Delete, the four basic operations performed on database applications. To make it easier to understand, we’ll make the following associations and definitions:

Keep in mind that we’ll need a payload to send in the Body of the request for the POST, PUT, and PATCH methods. But, for GET and DELETE, there’s no Body required.
Headers and Authorizations
Each endpoint should require certain Headers and Authorizations, but it’s not mandatory. However, they are needed to ensure that only the authorized “personnel” can access the DB to do specific actions.
Some of the Headers are added automatically by Postman or the front-end side; others are defined by the type of request you are doing or the type of Body you are sending. You won’t need anything specific, but here’s a list of useful headers: https://developer.mozilla.org/en-US/docs/Web/HTTP/Headers
Status Codes
Each request must return a status code. That’s how we can tell if there’s something good or bad happening.
Each status code consists of 3 digits. The first digit will tell you the impact the request has. Here’s a list of the big categories:
- Informational responses (100-199)
- Successful responses (200-299)
- Redirects (300-399)
- Client errors (400–499)
- Server errors (500–599)
The most usual status codes used and their meanings are:
- 200 OK – The request has succeeded.
- 201 Created – The request has succeeded, and a new resource has been created as a result.
- 400 Bad Request – The server could not understand the request due to invalid syntax.
- 403 Forbidden – The client does not have access rights to the content. It is unauthorized, so the server is refusing to give the requested resource. Unlike 401, the client’s identity is known to the server.
- 404 Not Found – The server can not find the requested resource. In the browser, this means the URL is not recognized. In an API, this can also mean that the endpoint is valid, but the resource itself does not exist.
- 500 Internal Server Error – Generic Error given by server when an unexpected condition or an Exception is encountered.
You can find more info on this here: HTTP response status codes – HTTP | MDN
Field Types
For this, you’ll need to become familiar with the JSON structure. Each field sent in a body must have a certain format. That’s how the database knows what to do with the obtained information (where to put it, what to accept and when to return an error). This list should be of help:
- String: “Test” (usually applied to names, cities, anything that should be saved as a string / sentence)
- Integer (int): “full” number, where no . or , is accepted (e.g. “userID”: 1,)
- Boolean: true/false options only (e.g. “is_admin”: false)
- Null: “first_name”: null,
- Empty: “first_name”: “”,
Find more details about JSON structure here – Introduction to JSON.
Example:
If we want to create a new user using the endpoint above, we should do a POST method with the payload provided on https://your.website.net/api/user/ endpoint.
How it should look:
For this specific example, the response contains userID. We will use this further to do the other methods, like GET, PATCH, PUT. You can’t simply edit it without a userID because the endpoint doesn’t know where to obtain the information or what user needs to be changed.
How to Test an Endpoint
Using the information above, here is a list of things to do, test, and check:
The POST method
- Make a POST with the payload above. Verify the status code received (should be 200/201) and do a GET on /api/user/userID/ to check what the server/database received.
Hint: You’ll need to use the GET on multiple occasions, just like a double-check, for different fields/objects.
- Make a POST with the same payload, but without the / (trailing slash) at the end – a 200 status code or (probably) a 400 Bad Request is expected to be returned.
- Make a POST with NO payload – usually, it should return the required field(s) and a 400 Bad Request status code.
- Make a POST with each missing required field and see what happens. A 500 status code is never accepted.
The GET Method
- There’s not much to test here, as you are simply obtaining the information from the server.
- Everything added in POST / PATCH / PUT – should be there. If it’s not, bug it!
- Do a GET with the correct endpoint and another one with missing “/” at the end, check the result.
- Do a GET on an inexistent ID – usually, it should return a 400 Bad Request status code.
- Ideally, a 200 status code should always be returned.
The PATCH/PUT Methods
- The big difference between PATCH and PUT is in the body.
- PATCH can be done without the FULL body, while for PUT, the exact format of the body is required.
- Redo the cases from the POST method and do the validations below.
- Do the missing “/” at the end case too.
The DELETE Method
- The DELETE method will delete the specified body data.
- Several status codes will be returned, but a 200 or 204 will do.
- Do a GET afterward and check the response – does it still contain the deleted data? If yes, bug it!
- There’s not much to test here, don’t forget about the “/” case at the end.
Other Methods
- Usually, OPTIONS and HEAD will always return a 200 status code, but there is not much to test on them.
- It depends on what other methods the endpoint supports.
- All the other methods – LINK / UNLINK / COPY / PURGE, etc. should return a 405 status code.
- This can usually be found in the requirements.
Validations
- Make a POST/PUT/PATCH with fields over 255 characters – the endpoint shouldn’t accept it and should return a good status code (e.g.,: 400 status code + “Ensure this field has no more than 30 characters” message in the response).
- Make a POST/PUT/PATCH with one of the fields being something that is not e.g., instead of “userID”: 1 send “userID”: false) – Depending on the field sent, the response should be something like “Not a valid string.”
- Use Null when you shouldn’t “first_name”: null, – “This field may not be null.” should be returned and a 400 Status Code.
- Use empty when it shouldn’t be empty “password”: “”, – “This field may not be blank” should be returned + 400 Status Code
- For phone numbers fields – check with minimum & maximum length, with empty and null, and with other structures that it shouldn’t be there (true/false), etc.
- For date fields – make sure the format is respected (e.g., DD/MM/YYYY).
Summary
- Every endpoint that needs to be tested should have a valid response (almost everything non-500s).
- Every endpoint SHOULD require authorization tokens.
- Every endpoint should cover the unused methods to return a 405 (a 500 status code is usually returned, which is a bug).
- After performing a POST/PATCH/PUT, do a GET and check the response to contain the previously sent data (this is the quickest way to check if the endpoint works as it should).
- Edit and change the JSON (body) to try to trick and break the client.
- If the validation on the back-end side works, make sure to check it on the front-end side as well – the validations on both sides should match.
Stay Updated with the Latest in QA
The world of software testing and quality assurance is ever-evolving. To stay abreast of the latest methodologies, tools, and best practices, bookmark our blog. We’re committed to providing in-depth insights, expert opinions, and trend analysis that can help you refine your software quality processes.
Delve deeper into a range of specialized services we offer, tailored to meet the diverse needs of modern businesses. As well, hear what our clients have to say about us on Clutch!
